
Monday, January 30, 2012
Priorities: Balancing Family and Ministry
It's hard to keep up with all the blogs these days but I came across this blog called Passionate Homemaking awhile back and really liked it. I follow it as often as I can, which sometimes might be every few weeks but tonight the entry caught my eye. It was on Balancing Family and Ministry. I must say as a mom who is still trying to figure it out it was a great reminder that we daily need to seek out God's will. To be in communication with him throughout our day everyday, not just on Sundays. Sometimes I want a quick answer. I am so structured. I need a plan. Ground rules and a to do list. God isn't like that. Doesn't mean he doesn't like order....we just need to be open to what he has for us everyday....I've been enjoying letting him be more of my day lately instead of just making it through everyday on my own. I've been trying to keep an ear open as I go about my day to day things...looking for moments to include Abbie in my day to help these typical mundane chores become teachable, quality time moments. Opening my ears up to what he has for me in helping out friends or speaking encouraging words. My cup feels more full than I've let it be in a long time. This season of my life is the busiest I have ever been, and yet letting God finally take control of it...it's given me more joy and fullness than I've had in a long time. Anyway...go check out the link. It's a good read in a good perspective!
Wednesday, January 25, 2012
DIY Birthday Banner Tutorial
So here it is, as promised....a DIY Birthday Banner Tutorial. After searching on Pinterest and Etsy and staring at birthday banners for awhile, I knew I could tackle making one myself, and quite honestly there is something about the love that goes into homemade things that is important to me. I know that this Birthday Banner will be important to Abbie one day. It will represent so much joy of "Her Day" during the year! I wanted to make sure the Banner I made was durable enough to last for years to come so I couldn't just make it out of tissue paper.
My neighbor has sewn each of her kids a birthday banner that they hang up every year. I loved that idea....but dangit....I just really don't like sewing. I like it to a certain extent but its the machine that gets me and honestly the competitive and perfectionist side of me hates that I am mediocre at something. Sewing itself isn't that hard but every time I sew the machine does something stupid and I have convinced myself its because of user error :) I think I might take a class someday when Dave is out of school.
Anyways....on to the tutorial....I hope that you enjoy!!!
First you will need some posterboard (as many pieces as you'll need for the size letters you want)- I needed (20) 6in X 8.5in cards for this project (HAPPY BIRTHDAY ABIGAIL...one letter per card). I bought the packet of 14in by 22in poster board and could make 4 cards out of one sheet...thus using 5 out of the 8 sheets in this packet (Cost about $2.50)

(Quantities you'll need for poster board and scrapbook paper vary...I wanted one letter on each card...I needed 20 letters: HAPPY BIRTHDAY ABIGAIL and mine ended up being 6inches X 8.5 inches. So you do need to do a little bit of math to figure it out but its not hard...I seriously just eyeballed it in the store. Scrapbook sheets are 12 inches square so I could fit two of my cards on them and I did buy a few extra sheets for the coordinating colors we will discuss later)- Cost 30cents each...on sale for 50% off at Hobby Lobby- I purchased 16 sheets total (Cost $4.80)


Next take two of your 6in X 8.5in poster board cards (you can make them any size you want to, I just knew I wanted them to be this big for what I wanted the end result to look like), and glue them to the backside of a piece of scrapbook paper. (I used rubber cement so I didn't get lines from the glue...you could probably use things like modge podge but I don't know much about that stuff. (Cost of Glue: $2)


Make sure all sides of the poster board are glued down really well to the scrapbook paper. Allow to dry for 5-10 minutes then cut them out. I rounded the edges of each of my poster board cards with scissors. To save time I glued all of mine at once and set each aside to allow it to dry. By the time I was done gluing the others I could start cutting apart the ones I had glued together first.

When you are done with all of your cards they should look like this. I laid mine out as a template for the order they would be in when I glued the letters onto them. Top row will eventually say HAPPY, 2nd row BIRTHDAY, and 3rd row ABIGAIL.

Next I took the extra sheets of scrapbook paper I purchased in solid colors that coordinated with my patterned sheets and cut the shapes I wanted out of them. I just cut out circles, triangles, and squares cause I don't own a fancy cricut machine and I can cut each of those out freehand :)

Then I selected a font I liked from Word and printed off HAPPY BIRTHDAY ABIGAIL. I think the font size was 250 or 300 in order to make it large enough to look good on the size of cards that I made.


Now glue your shape on the bottom 2/3 of your card. Glue the letter on top of that. Leave enough room at the bottom to make it look pretty or keep in mind if you wanted to add any extras to hang from the bottom of yours, that you will need room for those. I wanted to leave plenty of room at the top for mine because I wanted to lace ribbon through the cards to hang them.

Once I was finished applying all the shapes and letters, I punched holes in the top 1/3 of the cards, about an inch from the sides, and laced ribbon through them. I had a hard time getting the holes to be big enough for the ribbon to fold over, so I just punched holes out in a big enough circle to make the ribbon lay flat. They probably make some handy stamper that cuts this out automatically but I don't own one so that is what I did.
(Cost of Ribbon $1.99)
Tada! My birthday banner!!! It's so sturdy. The cards are very thick and I have no doubt that they will hold up for along time. I couldn't be happier with how it turned out!

You can modify your own however you'd like. If you have a girl throw on some more frilly ribbons and toule, you could even have borders or put stickers on or decals....its so customizable. This is just a template.
Total Cost was about $11.50)
Time Spent: An evening after Abbie went to bed...about 4 hours
I'll be posting a DIY on how to make pinwheels soon so don't forget to check back! These will be used for her birthday as well. I was gonna just claim defeat and have someone make her cake but then I remember my mom always made our cakes every year growing up and that meant a lot to me. My cake making experience....well mostly decorating experience is minimal but you can't learn unless you try (probably should apply that thought to sewing as well....) so I am going to be giving a go at fondant in the next few weeks....I'm not doing the whole cake in fondant cause it tastes horrible, butI am going to try and make some figurines out of fondant to decorate with...we're doing a Love Bug theme, cause that's my nickname for her :) Oh and speaking of...

just when you think she can't get any cuter....BAM she does! I just love her to bits! Happy Bannering!!!
Oh no....another food challenge!
So a few days I saw a post over at Keeper of the Home....go ahead. Go take a look and then come back and see my thoughts...
Dang....feeding a family of 4 on $250 a month!!?? Granted this doesn't include household/toiletry items which my budget does, but honestly 4 people....we only have 2 well 2 1/2....Abbie doesn't eat a ton but she does eat. As I looked at her list and realized we don't eat a ton of organic food in this house, nor do we really care to, but we do eat mostly unprocessed stuff (oats, brown rice, black beans, etc), it dawned on me that she did this while buying really expensive things like organic whole milk....$8.50 a gallon? Are you serious? Soo.....since I am really competitive and I don't like to lose (aka sore loser :) I think I might start to work on challenging myself to do this. It seems doable. Scary but doable. Especially since we don't buy expensive organics. We currently allow ourselves $150 every 2 weeks.....even that has been tight lately with the rising costs of groceries. But seriously....she did it for 4 people. I am getting better about being less wasteful but I could do a better job than I do. Also I think doing this will help hold me accountable to the amount of waste I have and also the amount of non necessities I actually end up purchasing!
There is a lot of media attention/marketing investment out there in the whole "organic" thing. I'm not saying some of it isn't legitimate. Since my husband is currently about to graduate with his degree in Food Science he has actually spent a fair amount of time studying some of these concepts. The actual regulations and rules applied to being able to claim something is organic vs hormone free, etc is really interesting, and marketing does play a huge part. From what I understand only a certain % of a product has to be organic to meet the requirement to label something "organic." This is why we choose not to purchase a lot of organic stuff. I'm not saying we don't ever. I do know there are a lot of different resources out there on foods that should be purchased organic etc. I am definitely interested in learning more about them and if you have any resources from reputable sources (like academic journals etc) please send them my way. I'd love to consider implementing some new staples into our household if they are indeed healthier and truly of higher nutritional value.
Anyway back to my challenge....I know I can be less wasteful and stretch things more. So I am going to see what I can do. I don't know that I can improve it much knowing that my budget includes toiletries and hers did not but I can sure as heck try! Let me know if you'd like to join my challenge. I'd love to see what everyone else does with their decreased budget!
Sunday, January 22, 2012
DIY Birthday Banner!!
I was so excited I had to share what I finished today....Abbie's Birthday Banner. It's durable enough to be stored and used over and over again in years to come. Yes I know...her birthday is in 2 months, but life is nuts in our house right now and I wanted to get a head start. I'll be posting "How To's" for this soon! Isn't it adorable!? I am so happy with how it turned out!

Monday, January 16, 2012
Part 3: Frugal Chicken Series- Chicken and Black Bean Quesadillas
And last but not least the final part of my 3 Part Frugal Chicken Series!!!
My last recipe is Chicken and Black bean Quesadilla's!!!
I had about 1 1/4 cups of chicken leftover from my crock pot chicken so these were a quick, easy, and healthy choice to use the rest of my chicken up with!
Ingredients:
Cooked chicken
1 can black beans (or cooked dried black beans)
salsa
cheddar cheese
Tortilla shells
The amounts of each really aren't important. It really depends on personal preference for how much of each ingredient you would like.
First, I put the black beans and cooked chicken in a saute pan and placed on medium heat to warm them up.

 Next, if you buy block cheese shred some up so its easy to throw in once you start assembling your quesadilla.
Then heat up a flat griddle on medium heat or you can use a larger bottom saute pan if you don't own a griddle. Once heated (you know if its hot enough by taking a little water and sprinkling it onto the hot pan- if you hear a slight sizzle its ready, if it sizzles and crackles loudly and smokes slightly then your pan is too hot. Once your pan is the correct temperature, then add a little olive oil and spread it around the pan.
 Toss your tortilla on and start adding on your chicken/black bean mixture, cheese, and salsa ingredients in the amounts you desire (aka....toddler mouths might not be able to handle much salsa if any at all, or you might have a person in your household who loves spicy salsa so use that on theirs instead). You can also throw in other ingredients here as well: corn, avocado, etc. Also keep in mind that the cheese is the glue that helps this all stick together. If you want a healthier option than use less cheese, but be aware that it maybe a bit messier.

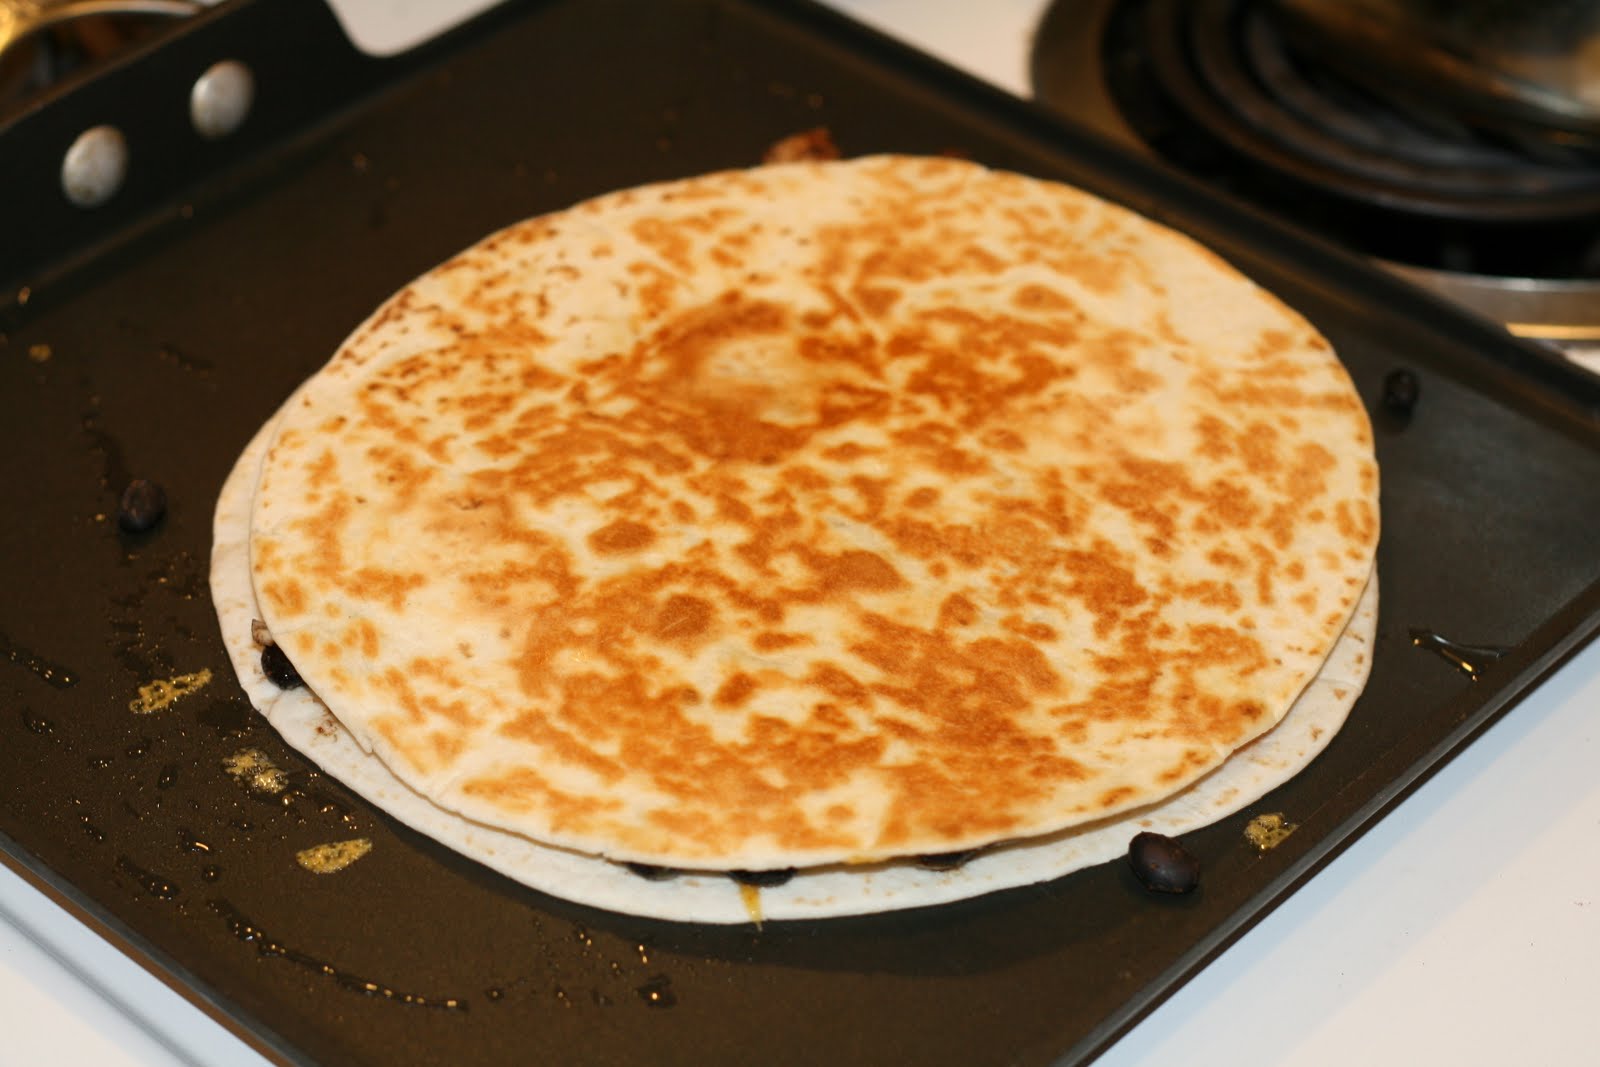 Once both sides are golden brown I transfer my quesadilla to a cutting board and cut it into 8 pieces.
 Serve with guacamole, sour cream, salsa, or just by itself. I had to share a picture of Abbie's plate that her grandma got her for Christmas....my hubby is a chef, so she had to get this when she saw that it said "Sous Chef."
 Here is a picture of Abbie enjoying her quesadilla. She is currently, like any baby/toddler on a carb kick....so she is enjoying the tortilla in this particular picture, but I know this will be a quick, easy, healthy staple in our household for years to come!

So not only did I accomplish what I set out to do.... turning 1 whole chicken into 3 meals, but I actually made 4 meals out of it if you include the leftovers I was able to freeze!
I encourage you to step out of your own comfort zone and challenge yourself to do something with your own whole chicken......for about $5 you can have enough meat for 3 or 4 meals of your own (depending on the size of your family it maybe less, but I know it will be a money saver for you regardless of your family size!). If you do take on the challenge please comment or email me at the_bridge83@gmail.com and let me know what you did. I'd love to hear even more quick and healthy recipe options for what I can use my chicken for in the future!!
Friday, January 13, 2012
Part 2: Frugal Chicken Series- Chicken Pot Pie with a Biscuit Crust
Part 2 of my Frugal Chicken Series is the second meal I made with the leftover chicken from my crockpot chicken....Chicken Pot Pie with a Biscuit Crust! A healthier twist to an all time favorite comfort food. It's been pretty cold and snowy for the last day here in Illinois so this recipe is a perfect end to a blustery day!
· 1 clove garlic, minced
· 1 cup reduced-fat chicken broth
· 1 1/2 cups diced potatoes, peeled
· 1 1/2 cups chopped carrots
· 1 cup green beans, cut in 1 inch pieces
· 1 (10 ounce) can reduced-fat cream of chicken soup (or cream
of mushroom)
· 1 1/2 tablespoons all-purpose flour
· 2 cups chopped cooked chicken breasts
· 2 tablespoons fresh parsley, chopped
· 1/4 teaspoon dried basil
· 1/4 teaspoon dried thyme
· 1/4 teaspoon black pepper
Biscuit Crust
· 1 cup all-purpose flour
· 1/2 teaspoon ground sage
· 1/4 teaspoon salt
· 2 tablespoons butter or 2 tablespoons margarine
· 1/3 cup skim milk
Directions:
1. In a large saucepan over medium heat, saute onions and garlic until tender, about 5 minutes (use oil or cooking spray).

This is a really important step. I've learned from my chef husband that
being patient with sauteing onions is seriously so important! Be patient...wait for them to be translucent and golden brown like this:

If your hubby is anything like mine....properly sauteed onions are the way to his heart :)
2. Add broth, potatoes, carrots and beans (you can actually cheat with this...I throw in whatever I have...carrots, potatoes, celery....anything that you want in that is a raw veggie)
3. Bring to a boil.
4. Reduce heat to medium-low.
5. Simmer for 12 minutes, partially covered.
6. Potatoes should be a bit undercooked.
7. Remove from heat.
8. Combine condensed soup and flour in a small bowl.
I skip this step and instead of using the creamy soups make my own thickener. For this particular recipe use 1 cup cold water to1/4 cup milk and add corn starch to thicken...about 1 1/2- 2TBSP, mix with the liquid first until dissolved and then add to mixture on stovetop. Always use COLD water for this!!

9. Add to vegetables, along with cooked chicken, parsley, basil, thyme and pepper (at this step I sometimes throw in some frozen veggies like peas, and corn just to bulk it up).
10. Stir well.
This is what the mixture will look like:

11. Pour into a casserole dish (I actually just use a 9 inch pyrex pie pan so it actually looks like a pie J)
12. Prepare biscuit crust. (You could easily just make drop biscuits to drop in it or biscuits by themselves instead...but I wanted a pie look. Also keep in mind this won't have a bottom crust, just the biscuit that covers the top....this helps keep it healthy :)
13. Combine flour, baking powder, sage and salt.

14. Cut in butter or margarine with a pastry blender until it looks like coarse crumbs.
15. Stir in milk.
16. Form the dough into a ball, adding a bit more flour if its too sticky.
17. On a floured surface, roll out dough to the size where it will fit the top of
your casserole dish. (basically like if you were making a pie crust).

18. Place dough on top of chicken mixture.

19. Prick dough with a fork several times.
20. Bake at 400 F for 25 minutes, until crust is golden brown.
21. Let stand for 5 minutes.

22. Serve.

Nutritional Information
Serving Size: 1 (304 g)
Servings Per Recipe: 4
Per Serving:
Calories 407.9, Calories from Fat 106, Total Fat 11.8 g, Saturated Fat 5.3 g, Cholesterol 74.4 mg, Sodium 294.7 mg, Total Carbohydrate 46.9 g, Dietary Fiber 4.8 g, Sugars 5.0 g, Protein 27.8 g
This recipe has become a favorite in our house. It makes great leftovers to take in lunches or something for lunch on days I am at home with Abbie to easily reheat. It's healthy, and easy....doesn't take long at all! This is Part 2 of my frugal whole chicken series. Stay tuned next week for part 3, my final recipe of the series.
And just in case you were wondering what my little helper was up to? Well she was making her own chicken pot pie in the cupboard!

Wednesday, January 11, 2012
Part 1: Frugal Chicken Series- Crock Pot Chicken
So a few months ago I got an idea. I am sure I am not the first person to do this, but for me it was a really big deal. With grocery costs rising, and our income currently doing nothing but staying the same if not decreasing since I went from full time at my job to part time with our daughters arrival, I started getting kind of irritated at our grocery bill. I manage our food costs. I do the grocery shopping and most of the cooking and dangit....it just feels like you are fighting a losing battle sometimes.
So anyway, I have never really tackled a whole chicken before. I mean really? A whole anything meat is just intimidating to me and I am sure many others feel the same way but man....I often see them for 97 cents a pound! Seriously? You know how much meat you can get in 1 chicken?? So I finally decided to suck it up. Let go of my pride and just do it. That particular week Jewel happened to have a sale on chicken broilers/fryers (stay away from the other types of whole chickens...sometimes its older chickens and therefore the meat is not quite as good). I bought two and proudly left the store. Now what the heck was I supposed to do with them?
My original inspiration came from this post but I have done my own tweaking and am proud to present to you my frugal chicken series!
My goal: 1 whole chicken, 3 meals, plus some chicken stock to freeze for future cooking purposes....not sure if I was gonna be able to do it, but I sure as heck was going to try!
So lets start at the beginning.
Day 1
Menu: Whole chicken in crock pot, potatoes, roasted veggies (for purposes of this series I am not going to talk about the side dish preparation...just the chicken dishes.)
I read somewhere that cooking a whole chicken in a crock pot tasted more like the rotisserie ones in the stores if you placed the chicken in the crock pot on top of aluminum foil balls. I did it and I liked the taste of the chicken so I think I will continue to do so, but you don't have to. I loosely ball up 3 aluminum foil balls and placed them in the bottom of the crock pot.


I then sprinkled the chicken lightly with paprika, garlic salt, salt, and black pepper.

7 hours later you have a delicious whole chicken that you hardly had to do anything to prepare! Unfortunately this particular night I got home from work late and Abbie was getting crabby so Dave had to feed her without me being able to get a picture of the finished product but its kinda self explanatory....it looked like a whole cooked chicken :)
Now everything left in the bottom of the crock pot can be used for chicken stock. We ate what we wanted off of the chicken for dinner that night and then the rest of the chicken I took off the bones, chopped it up, and put in the fridge for my other meals....the chicken is so tender after being in the crock pot that it just falls off the bones with ease. It probably took me 10-15 minutes to pull it all off, chop it up, and put it in the fridge...maybe even closer to 5! Don't forget to save the bones though! Throw those back into the crock pot to make your stock. That particular night was kind of late so I didn't have enough time to make the stock. I just put what was left in the crock pot, plus the bones (minus the aluminum foil) into the fridge overnight and then made it the next day when I had time. You can still make it in a crockpot if you want to...its easier that way, but we just made it on the stove. I put all the contents from the crockpot, plus bones into the pan, added some chopped up carrots, a couple of bay leaves, and an onion or two into the pot (1-2tsp of peppercorns adds a nice flavor if you have any in your cupboards).
 Add enough water just to cover all of your ingredients and let simmer on low (or on low in your crock pot for 4 hours). After four hours is up, wait for it to cool a bit, then you'll want to pour the contents through a strainer to sift out all your solids while still saving your liquid.
Once the liquid has cooled I bag it in quart size zip lock storage bags and freeze it. I just use the cups as molds so its easier to pour, but once the liquid is in them you could lay them flat and it would take up less room in your chest freezer.
 So there you have it! Part 1 of my 3 part series on making chicken frugally! Stay tuned for part 2!!!
 So there you have it! Part 1 of my 3 part series on making chicken frugally! Stay tuned for part 2!!!
Bon appetit!
Subscribe to:
Posts (Atom)